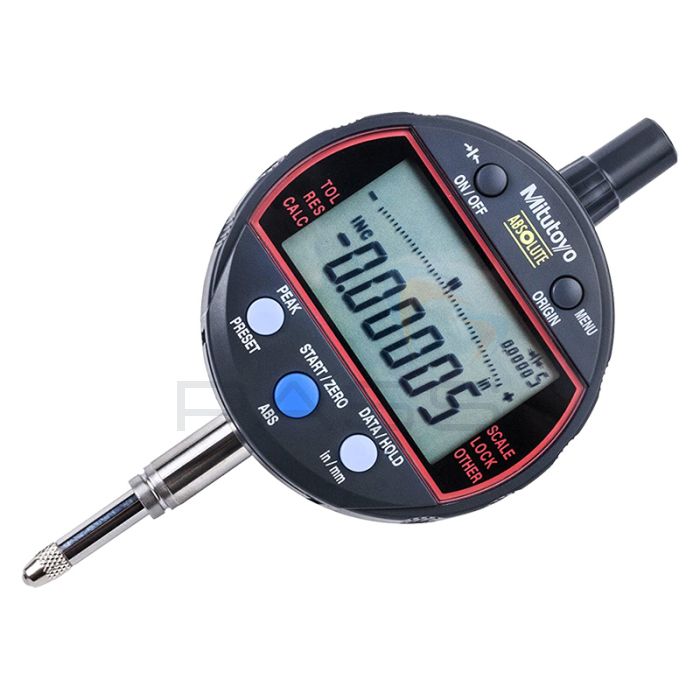
Mitutoyo 543-341B ABSOLUTE Digimatic Calculating Indicator ID-C ID-C - .5" / 12.7 mm

- Tolerance judgement available
- Large, easy-to-read 7-digit LCD
- Equipped with a data output port
SERIES 543 - ABSOLUTE Digimatic Calculating Indicator ID-C
- Tolerance judgement is available by preset upper and lower limit values.
- The chance of over-speed error has been avoided thanks to the ABSOLUTE sensor.
- The ABSOLUTE sensor restores the last origin position automatically when the indicator is turned on.
- Equipped with a data output port that enables incorporation into measurement networking and statistical process control systems.
- Large, easy-to-read 7-digit LCD readout with a character height of 8 mm. Can be rotated up to 330° to achieve the optimum reading position.
- This indicator incorporates an internal calculation function that operates from plunger displacement. Using dedicated fixtures, measurements of outside and inside diameter and radius of curvature can easily be made without needing to use conversion tables or manual calculations and requiring access to only one side of the component to be measured.

Technical Data
- Measuring force: 1.5 N or less
- Display: 6-digit LCD and sign
- Scale type: ABSOLUTE electrostatic linear encoder
- Stem diameter: 8 mm
- Standard contact point: 901312
- Battery: CR2032 (05SAA217)
- Battery life: 1 year under normal use*¹
- Calculation function: f(x) = Ax + B + C/x
- x = plunger movement
- A, B, and C are user definable over a wide range
- *¹Operation time per day: 8 hours
Functions
- Zero Set
- Origin-Set/Preset
- GO/±NG Judgement
- Max/Min Value Holding
- Power ON/OFF
- Data Hold
- Data Output
- Function Lock
- Inch/mm Reading (inch/mm models)
- Alarm:
- Low voltage
- counting value composition error
- overflow error
- tolerance limit setting error

Offers
This winter when you buy over £100 worth of Mitutoyo products online you’ll receive either a free Mitutoyo Engineers’ Reference Book or a Metrology Handbook depending on the value of your item(s). Available for a limited time or while stocks last, this offer is perfect for metrology professionals and engineers requiring a reference guide complete with conversions, measurement principles, standards, and practices. For further details visit the Mitutoyo Online Offer Free Book Page
Dimensions

Inch/Metric
| SKU | Range | Resolution (selectable)*³ | Max. permissible error | ||
|---|---|---|---|---|---|
| MPEE*4 | Hysteresis MPEH | Repeatability MPER | |||
| MIT-543-341B | .5" / 12.7 mm | .00001" - .05", 0.0002 - 1 mm (12 steps)*5 | ±.0001" / 0.003 mm | .0001" / 0.002 mm | |
*³Since the calculation resolution is one micrometer (0.001 mm), using sub-micrometer resolution settings may result in the 4th-place digit being unreliable, particularly when B is set to a very low value and C = 0. It does not change at all with certain combinations of calculation coefficients (e.g. A =1, B = C = 0). The 3rd-place digit representing micrometers (if displayed) is always reliable.
*4Error of indication for the total measuring range.
*5Applies only if not connected to a data processor.
| Digital/Analog | Digital |
|---|---|
| Measuring force MPL | ≤1.5 N |
| Protection | IP42 |
| Type | EN ISO Standard |
| Mass | 170 g |
| Scale | Electrostatic capacitance type absolute linear encoder |
| Display | LCD, character height 8 mm, 330° rotatable |
| Max. Response Speed | Unlimited |
| Measurement Frequency (MAX/MIN/RANGE) | Standard mode: 10 times/s Fast mode: 50 times/s (plunger speed max. 50 µm/s for peak measurement) |
| Alarm | Low voltage, ABS composition error, overflow error, setting error |
| Stem Ø | 8 mm |
| Contact Point | Carbide ball, thread: M2.5x0.45 |
| Power Supply | 1 battery CR2032 |
| Battery Life | Standard mode: approx. 1 year Fast mode: approx. 4.5 month |
| Remarks | Digital step is switchable (12 steps) |
| DATA/HOLD | Yes |
| PRESET 3x | Yes |
| Digimatic Data Output | Yes |
| ON/OFF | Yes |
| Analog Bar Resolution Switchable | Yes |
| Function Lock | Yes |
| GO/±NG Judgement | Yes |
| Fast Measurement Mode | Yes |
| ABS / INC (INC ZERO) | Yes |
| Selectable Resolution | Yes |
| Calculation Function (with formula) | Yes |
| Counting Direction Switchable | Yes |
| Inch/Metric Switchable | Yes |

Accessories


